| 1. Container Preparation and Openings |
| Base preparation |
Support foundation |
Level concrete pads, pier blocks, or a continuous foundation designed for the site soil and container load |
Minimum 4 corner supports; additional supports may be required for long containers |
Set supports on stable, drained ground and keep the container floor above standing water. Confirm level in both directions before cutting openings. |
Container is level, stable, ventilated below the floor, and protected from direct soil contact. |
| Structural survey |
Container shell |
Inspect corner posts, top and bottom rails, side rails, roof, floor, and existing welds |
Complete inspection before modification |
Do not remove major structural members without a qualified structural design. Frame every new opening with welded or bolted reinforcement. |
No uncontrolled corrosion, deformation, sharp edges, or water penetration. Damaged areas are repaired before interior work. |
| Opening reinforcement |
Door and window frames |
Steel rectangular tubing or engineered steel framing sized for the opening and local loads |
One reinforced frame per opening |
Cut openings only after measurements are checked. Tack-weld, verify squareness, then complete welds or approved bolted connections. |
Openings are square, plumb, weather-tight, and free from weld spatter and sharp projections. |
| 2. Exterior Door Installation |
| Personnel entrance |
Insulated exterior door |
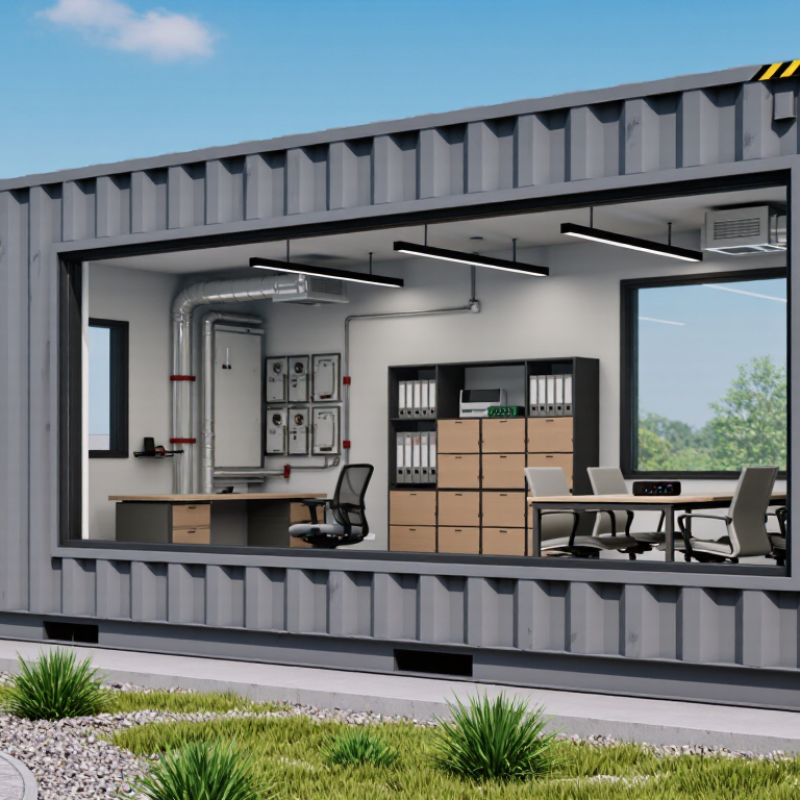
Typical clear opening: 36 in wide × 80 in high; insulated, weather-resistant door with corrosion-resistant hardware |
1 door for a small office; provide a second exit where required by occupancy and code |
Install a level threshold, continuous perimeter weather seal, durable hinges, latch, and a lockset appropriate for the use. |
Door opens without binding, latches securely, seals evenly, and provides the required egress clearance. |
| Door threshold |
Weatherproof transition |
Sloped sill pan or threshold flashing with compatible sealant |
1 complete sill system |
Direct water away from the interior floor. Seal fastener penetrations and maintain a continuous connection to the wall flashing. |
No visible gaps, ponding, air leakage, or water intrusion during hose testing. |
| Door finish |
Protective coating |
Cleaned, primed, and painted steel or finished corrosion-resistant surface |
All exposed steel around the opening |
Remove loose rust and mill scale, use a compatible metal primer, and apply the finish coating according to the coating system requirements. |
Coating is continuous, dry, evenly applied, and free from runs, pinholes, and exposed bare metal. |
| 3. Window Installation |
| Natural light and ventilation |
Insulated window unit |
Typical size: 36 in wide × 48 in high; double-glazed or equivalent energy-efficient unit with operable ventilation section |
Two windows for a typical small office; final quantity depends on room size, daylight, and ventilation requirements |
Install the window level and plumb in a reinforced opening. Use compatible sill flashing, side flashing, head flashing, backer rod, and exterior sealant. |
Sashes operate smoothly, glazing is undamaged, perimeter seals are continuous, and the unit is securely fastened. |
| Window safety |
Emergency escape consideration |
Where a window is designated for emergency escape, verify required clear opening, sill height, and access dimensions with local regulations |
As required by the adopted building code |
Do not assume a standard window meets emergency escape requirements. Confirm the clear opening after installation, not only the rough opening. |
Required emergency access is documented and unobstructed. |
| Window trim |
Interior and exterior casing |
Moisture-resistant trim or sealed wood-based trim with flexible sealant at transitions |
Four sides per window |
Maintain a small movement joint where dissimilar materials meet. Finish exposed metal edges before installing trim. |
Trim is straight, tightly joined, sealed, and ready for final paint or protective finish. |
| 4. Electrical System Installation |
| Electrical service |
Distribution panel |
Panel rating and feeder selected from the calculated load; common small-office planning range is 60–100 A, subject to design verification |
1 panel located in an accessible, dry area |
Use a licensed electrician where required. Provide working clearance, grounding and bonding, overcurrent protection, and service disconnecting means according to local requirements. |
Panel is labeled, accessible, securely mounted, and approved through required inspection. |
| Lighting |
LED ceiling or surface fixtures |
Energy-efficient fixtures selected for office use; target general illumination is approximately 300–500 lux |
Two to four fixtures for a 20 ft container, depending on layout and fixture output |
Locate fixtures to reduce shadows at desks and maintain access to serviceable components. Provide switching at the entrance. |
Lights operate from the intended switch, provide even illumination, and have no exposed conductors. |
| Receptacles |
General-purpose outlets |
Grounded receptacles placed along usable wall space; weather-resistant types used in damp or exterior locations |
Plan outlets near each workstation and at least one spare outlet on each practical wall section |
Install boxes flush with the finished wall. Keep receptacles clear of plumbing, insulation compression, and door swing zones. |
Polarity, grounding, and protection devices test correctly. Faceplates are secure and undamaged. |
| Dedicated circuits |
Heating, cooling, and equipment circuits |
Separate circuits sized for the nameplate load of HVAC units, water heaters, printers, or other fixed equipment |
One circuit per major fixed load unless the electrical design permits otherwise |
Verify voltage, amperage, disconnect requirements, conductor size, and overcurrent protection before connection. |
Equipment starts normally without nuisance tripping. Circuit identification matches the panel schedule. |
| Data and communications |
Low-voltage pathway |
Conduit or cable pathway separated from line-voltage wiring and protected from sharp metal edges |
One pathway to each planned workstation or communications location |
Use bushings or grommets at metal penetrations. Maintain the separation required by local electrical and communications rules. |
Cables are supported, labeled, protected, and tested for continuity or network performance as applicable. |
| 5. Insulation, Interior Walls, and Ceiling |
| Thermal insulation |
Wall and ceiling insulation |
Rigid board, closed-cell spray foam, or batt insulation selected for the climate zone and available cavity depth |
Install continuously across all exposed walls and the ceiling |
Cover gaps around framing, maintain required clearances from electrical equipment, and avoid compressing insulation beyond the manufacturer's installation limits. |
Insulation is continuous, dry, securely held, and free from visible voids or major thermal bridges. |
| Vapor and air control |
Air-sealing system |
Compatible sealant, tape, membrane, or foam used at joints, penetrations, and transitions |
Seal the complete interior envelope |
Coordinate penetrations for wiring, plumbing, windows, and doors before closing the walls. Follow the climate-specific vapor-control strategy. |
Visible penetrations are sealed and the interior surface is ready for wall lining. |
| Interior wall lining |
Gypsum board or finished panel system |
Moisture-resistant gypsum board or durable interior panels; typical gypsum thickness is 1/2 in |
Cover walls and ceiling as required by the layout |
Use corrosion-resistant fasteners suitable for the substrate. Provide backing for cabinets, shelving, grab bars, and wall-mounted equipment. |
Panels are flat, joints are finished, corners are reinforced, and fastener heads are concealed. |
| 6. Flooring and Final Interior Finishes |
| Subfloor preparation |
Container floor inspection |
Existing floor cleaned, dry, sound, and tested for levelness and moisture compatibility with the selected finish |
Entire occupied floor area |
Repair damaged sections, remove contaminants, and install an approved underlayment where required by the flooring system. |
Surface is stable, clean, reasonably flat, and free of protruding fasteners or sharp edges. |
| Floor finish |
Resilient flooring, laminate, or sealed plywood |
Commercial-grade finish selected for expected foot traffic and moisture exposure |
Cover the complete interior floor area, including around the door threshold |
Maintain manufacturer-required expansion gaps and use compatible transition strips at the entry and changes in flooring. |
Floor is securely bonded or locked, level at transitions, clean, and free of lifted edges or visible gaps. |
| Interior painting |
Walls, ceiling, and trim |
Low-odor interior coating system with primer where required by the substrate |
Two finish coats are typical after surface preparation |
Fill joints, sand smooth, remove dust, and protect electrical devices, glazing, flooring, and hardware during painting. |
Color and sheen are uniform, with no runs, holidays, sanding marks, or unpainted edges. |
| Ventilation and comfort |
Mechanical ventilation or HVAC unit |
System sized for room volume, occupancy, climate, insulation level, and equipment heat load |
One appropriately sized system or a compliant natural-ventilation arrangement |
Provide condensate drainage, service access, filter access, and sealed penetrations. Do not discharge condensate onto the foundation. |
Airflow, temperature control, drainage, and controls operate correctly without excessive noise or leakage. |
| Final safety check |
Completion inspection |
Integrated review of structure, weatherproofing, electrical, ventilation, fire safety, and finishes |
One complete inspection before occupancy |
Record test results, equipment manuals, circuit schedules, sealant locations, and any required permits or approvals. |
Ready for use after all required local inspections and corrections are complete. |
|
Planning note: Dimensions and quantities shown are typical examples for a small office converted from a standard intermodal container. Final structural, electrical, fire-safety, accessibility, energy, and ventilation requirements must be verified against the adopted codes, site conditions, occupancy, and permit requirements.
|